
First off, I just recently discovered how to make my own version of Glimmer Mist right at home -
here's a link on you-tube that got me started -
Basically the formula here is : some water in a bottle that can mist + arcylic paint + glitter glue .
Other variations include : water +Tim Holtz® Distress Ink Reinker + Perfect Pearl powder.
Other variations include : water +Tim Holtz® Distress Ink Reinker + Perfect Pearl powder.
So if you haven't invested in a lot of $ buying these Glimmer Mists/ Maya Mists etc
try making some of your own perhaps ! & have some spray bottle fun with them ! :lol:
try making some of your own perhaps ! & have some spray bottle fun with them ! :lol:
I love using more than one color of Mist on my projects usually - love layering several colors especially .
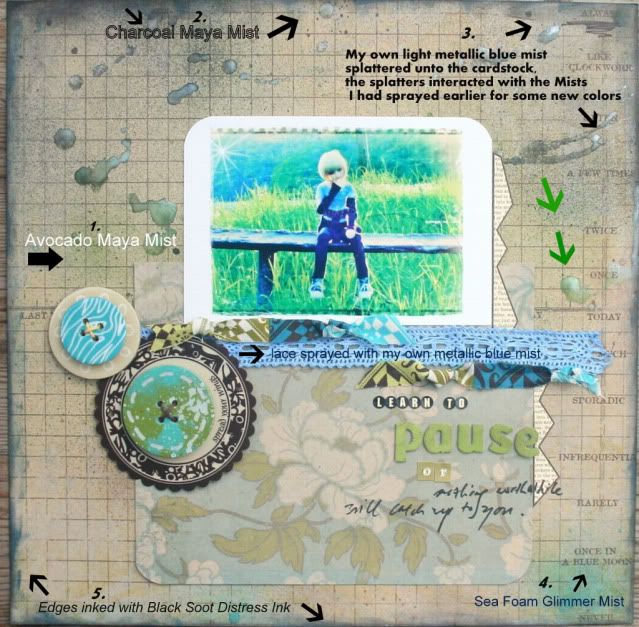
For this particular layout , starting with the top half - here's what I did :
1. I start with the lightest color of choice in this case - Avocado Maya Mist -
I randomly sprayed it over the top half of the cardstock especially in the areas outside of the photo .
( I usually mist first before I glue anything down to the background.)
I randomly sprayed it over the top half of the cardstock especially in the areas outside of the photo .
( I usually mist first before I glue anything down to the background.)
2. The color I wanted to use next is Charcoal Maya Mist - to add some depth of color,
as the photo I'm using here has rather bright colors.
I sprayed this color closer to the edges of the cardstock.
as the photo I'm using here has rather bright colors.
I sprayed this color closer to the edges of the cardstock.
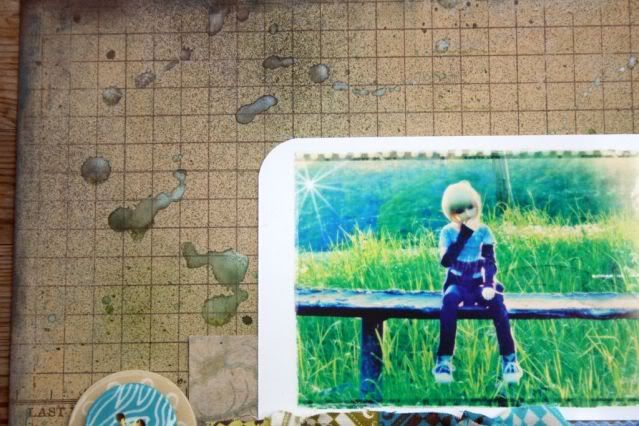
3. I decided to try splattering some Mist for this layout, for the first time .
I used my own light metallic blue mist ( my base color is blue metallic acrylic paint & added some black stickles ) for the splatters ( use a paintbrush ) .
And then I made an accidental discovery after this step as the splatters I made interacted with the Avocado & Charcoal Mists that I had sprayed on earlier and
had not quite dried up when I splattered.
Hence some of the splatters had some depth of color.
4. For the bottom half of the cardstock ,
I sprayed Seafoam Glimmer Mist ( a blue/green color )
to match some of the color in the pic I was using here.
I sprayed Seafoam Glimmer Mist ( a blue/green color )
to match some of the color in the pic I was using here.
I also sprayed some Brown Glimmer Mist after that -
going in towards the middle of the cardstock.
going in towards the middle of the cardstock.
5. Lastly , to anchor all the misted colors down on the background , I inked Black Soot Distress ink all around the edges . Alternatively I could have dry painted the edges with a dark paint color .
All in, for this layout, I used 5 colors of mists for the background .
I hope this helps you to give your own misted background a try ! :lol:
3 comments:
Well it's been a while my friend but what delightful eye candy to catch up on... WOW!! such delightful creations as usual Pearl your creativity knows no bounds.
Sorry it's been soooo long since i popped by I have missed seeing what you've been up to.
Thank you for your comments of support girl it really means a lot to me.
hugs
Chris xx
WoW I love your LO Pearl..that misting is sooo cool...must check those out!!!love them..TFI
Have a fab weekend:)xxx
Hi Pearl!!
How very creative you are!!! Love your layouts - I'm a great fan of misting - but wanted to share this warning I read somewhere, about alcohol inks and misting:
http://creativelyouttacontrol.blogspot.com/2009/11/alcohol-inks.html
Hope you'll be careful!
Hugs,
Monique
Post a Comment